As an Amazon Associate, I earn from qualifying purchases.
Nothing spoils a camping trip faster than a tent zipper that won’t move in the middle of the night or refuses to close when rain is coming. Fortunately, most zipper problems can be fixed with simple tools and a little patience.
Tent zippers face dirt, sand, moisture, and constant strain, which often leads to sticking, misalignment, or slider issues. This guide shows you how to handle those problems step by step, whether it’s a stuck zipper, broken teeth, or a slider that’s off track. With the right approach and basic tools, you can quickly repair your tent zipper, save your trip, and extend the life of your gear.
Contents
- 1 5 Common Tent Zipper Problems
- 2 How to Fix a Tent Zipper (Step-by-Step)
- 2.1 Step 1: Clean the Zipper Track and Remove Dirt/Debris
- 2.2 Step 2: Lubricate the Zipper with Graphite Pencil, Soap, or Zipper Lubricant
- 2.3 Step 3: Realign Misaligned Teeth Gently with Pliers
- 2.4 Step 4: Fix a Stuck Zipper by Slowly Moving the Slider Back and Forth
- 2.5 Step 5: Reattach a Slider if it has Come Off (if possible)
- 2.6 Step 6: Replace the Slider or Zipper if Severely Damaged
- 3 Tools & Products to Help Repair Tent Zippers
- 4 Tips to Prevent Tent Zipper Problems
- 5 Frequently Asked Questions
5 Common Tent Zipper Problems
Tent zipper issues are common for campers, but most are simple to identify and fix. Sticking, separating, or worn sliders can usually be resolved with basic tools and quick maintenance. Regular cleaning, lubrication, and inspection also help prevent bigger problems and keep your tent ready for every trip.
1. Zipper Stuck or Jammed
A stuck zipper represents the most common tent zipper malfunction. The slider refuses to move in either direction, often accompanied by visible dirt, sand, or debris lodged between the teeth. This problem typically develops gradually as particles accumulate in the zipper track during normal use.
Salt residue from ocean camping, pine sap from forest sites, or simply dust and grit can create enough friction to lock the mechanism completely. Sometimes the fabric itself gets caught in the slider, creating an immediate jam that requires careful extraction to avoid permanent damage.
2. Slider Comes Off Track
When the zipper slider separates from one or both sides of the track, it creates a gap that won’t close properly even if you can move the slider. This issue often occurs when excessive force is applied to a stuck zipper, causing the slider to jump off the teeth rather than glide along them smoothly.
Temperature changes can also contribute to this problem, as metal components expand and contract at different rates than fabric, creating alignment issues that allow the slider to derail.
3. Teeth Misaligned or Broken
Misaligned zipper teeth create bumps and catches that prevent smooth slider operation. This misalignment can result from fabric stress, improper storage, or manufacturing defects that become apparent over time. Individual teeth may bend out of position or break entirely, creating permanent obstacles in the zipper path.
Broken teeth usually occur near high-stress points like corners or areas where the tent fabric experiences the most tension during setup and use.
4. Zipper Won’t Close Properly
Sometimes the slider moves freely along the track but fails to properly join the two sides of the zipper. This creates gaps that compromise your tent’s weather protection and can worsen over time as stress concentrates on the functional portions of the zipper.
This problem often indicates worn slider components or teeth that have lost their precise shape, preventing the interlocking mechanism from engaging correctly.
5. Slider Too Loose or Too Tight
A loose slider moves too easily and may not maintain its position, allowing the zipper to open unexpectedly. Conversely, an overly tight slider requires excessive force to operate and may stick frequently or jump off track under pressure.
Both conditions typically develop gradually as the slider mechanism wears from repeated use, but sudden changes can indicate debris buildup or damage from forceful operation.
How to Fix a Tent Zipper (Step-by-Step)
Repairing a tent zipper is easier than it looks. Issues like a loose slider, misaligned teeth, or stuck fabric can be fixed with simple steps, helping you restore function and extend your tent’s lifespan.
Step 1: Clean the Zipper Track and Remove Dirt/Debris
Begin by thoroughly cleaning the entire zipper track to remove accumulated dirt, sand, pine sap, or other debris. Use an old toothbrush or small brush to gently scrub between the teeth, working from both sides of the zipper. Pay special attention to areas where the slider currently sits, as debris often concentrates around stuck mechanisms.
For stubborn residue, dampen the brush slightly with warm water, but avoid soaking the surrounding fabric. Sand and grit respond well to dry brushing, while sticky substances like tree sap may require gentle scraping with a plastic tool or fingernail.
Work methodically along the entire zipper length, not just the problematic area. Debris in one section can migrate to other areas during zipper operation, so comprehensive cleaning prevents recurring problems.
Step 2: Lubricate the Zipper with Graphite Pencil, Soap, or Zipper Lubricant
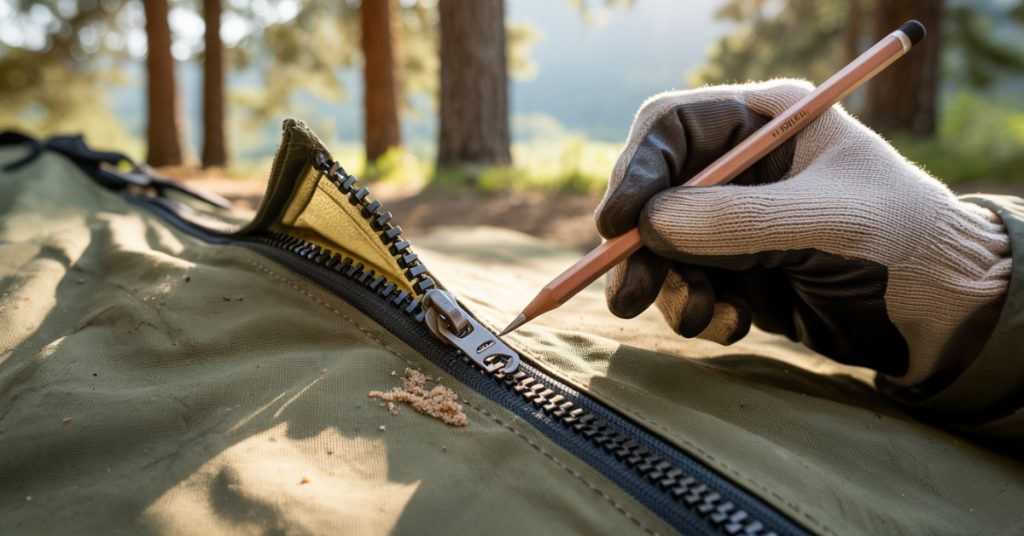
Once the zipper is clean and dry, apply lubrication to reduce friction between the slider and teeth. A standard graphite pencil works excellently for this purpose—simply rub the pencil lead along both sides of the zipper teeth, covering the entire track length.
Alternatively, rub a bar of soap along the teeth, focusing on areas where the zipper sticks most persistently. The soap creates a slippery coating that helps the slider glide smoothly while also repelling dirt and moisture.
Commercial zipper lubricants designed for outdoor gear provide the most durable solution, but field repairs often rely on readily available alternatives like candle wax, lip balm, or even a small amount of cooking oil applied sparingly.
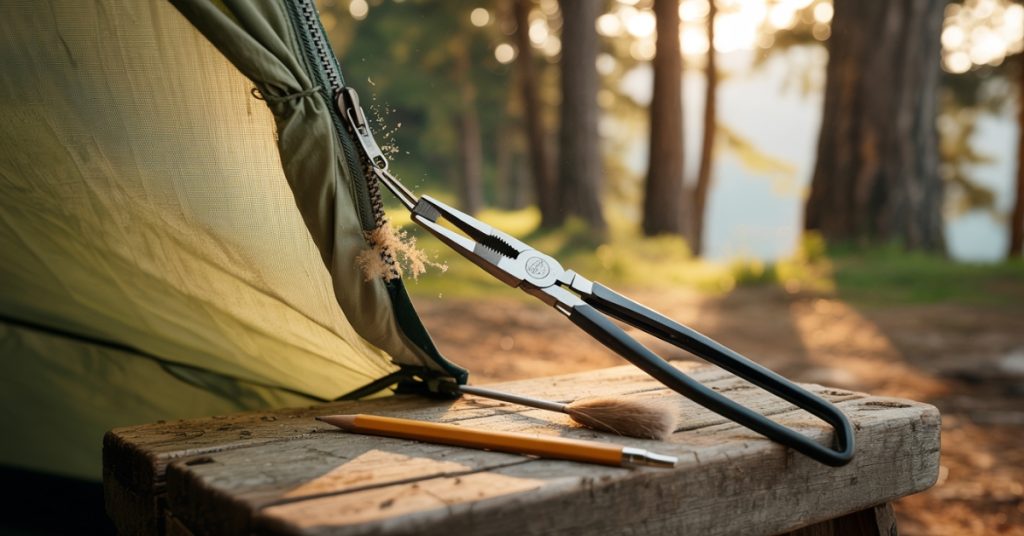
Step 3: Realign Misaligned Teeth Gently with Pliers
Examine the zipper track closely for bent or misaligned teeth that create obstacles for the slider. Using needle-nose pliers, carefully grasp individual misaligned teeth and gently bend them back into proper position.
Work slowly and apply minimal pressure, as excessive force can break teeth entirely. Metal zippers typically tolerate more adjustment than plastic ones, but both require patience and precision.
Check your progress frequently by testing the slider movement in the repaired area. Properly aligned teeth should allow the slider to pass smoothly without catching or requiring excessive force.
Step 4: Fix a Stuck Zipper by Slowly Moving the Slider Back and Forth
With the zipper cleaned and lubricated, attempt to free a stuck slider using gentle, persistent pressure. Avoid yanking or jerking motions that can cause additional damage. Instead, apply steady pressure while working the slider back and forth in small increments.
Sometimes rocking the slider side-to-side while pulling helps it navigate past obstacles. If the slider moves slightly in one direction, continue that motion before attempting to reverse direction.
Heat can help stubborn zippers by expanding metal components slightly. Try warming the zipper with your hands or placing the tent in warm sunlight for several minutes before attempting repair.
Step 5: Reattach a Slider if it has Come Off (if possible)
When a slider completely separates from the zipper track, examine both the slider and the track for damage before attempting reattachment. Look for bent or broken portions that might prevent proper reengagement.
To reattach a slider, you typically need to work it onto the track from the bottom end of the zipper. This may require partially separating the zipper teeth to create an entry point for the slider mechanism.
Some slider designs include small tabs or guides that must align precisely with the zipper track. Take time to understand your specific slider design before forcing components together, as improper assembly can cause permanent damage.
Step 6: Replace the Slider or Zipper if Severely Damaged
When cleaning, lubrication, and adjustment fail to restore proper function, replacement becomes necessary. Slider replacement is often possible using repair kits available at outdoor gear stores or online retailers.
Match the replacement slider to your original by measuring the width and noting any special features like locking mechanisms or pull tabs. Installation typically requires removing the old slider and sliding the new one onto the track from the bottom.
Complete zipper replacement represents a more complex repair that may require sewing skills or professional service. However, this option can restore your tent to like-new condition when other repairs prove inadequate.
Tools & Products to Help Repair Tent Zippers

The right tools make tent zipper repairs quicker and more effective. A zipper repair kit with sliders, needles, and thread is essential, while zipper lubricant keeps zippers running smoothly. For tougher fixes, sewing gear or strong adhesives may be needed to ensure lasting results.
1. Zipper Lubricant or Wax
Commercial zipper lubricants designed for outdoor gear provide superior performance and longevity compared to improvised alternatives. Products like Gear Aid Zipper Cleaner and Lubricant or McNett Zip Care contain ingredients specifically formulated to withstand outdoor conditions while repelling dirt and moisture.
Beeswax or paraffin wax from candles also work well and resist washing out during rain or cleaning. Apply wax sparingly to avoid attracting additional dirt, and reapply as needed throughout extended camping trips.
2. Graphite Pencil or Bar Soap
Standard graphite pencils provide excellent emergency lubrication that’s available almost anywhere. The graphite creates a dry lubricant that won’t attract dirt like oil-based products might. Choose softer pencils (2B or 3B) for easier application and better coverage.
Plain white soap bars work similarly to commercial lubricants and offer the advantage of also cleaning the zipper during application. Avoid scented or moisturizing soaps that may leave residues or attract insects.
3. Needle-Nose Pliers
High-quality needle-nose pliers allow precise manipulation of individual zipper teeth and slider components without causing damage to surrounding areas. Look for pliers with smooth jaws to avoid scratching metal surfaces, and consider pliers with built-in wire cutters for additional versatility.
Small electronics pliers work particularly well for delicate adjustments on lightweight tent zippers, while standard needle-nose pliers handle heavier-duty repairs on larger camping tents.
4. Replacement Zipper Sliders or Repair Kits
Zipper repair kits from manufacturers like Gear Aid, Freesail, or YKK contain multiple slider sizes and types to match common tent zipper configurations. These kits often include installation tools and detailed instructions for slider replacement.
When purchasing replacement sliders individually, measure the existing slider width and note any special features like locks or decorative pulls. Many outdoor retailers offer zipper repair services if you’re uncomfortable performing the replacement yourself.
5. Sewing Kit for Zipper Replacement
Complete zipper replacement requires basic sewing supplies including heavy-duty thread, needles appropriate for tent fabric, and a seam ripper for removing old zippers. Upholstery thread or outdoor gear repair thread provides better durability than standard sewing thread.
Consider bringing a compact sewing kit on extended camping trips for emergency repairs. Even basic stitching skills can temporarily secure a failed zipper until proper repairs are possible.
Tips to Prevent Tent Zipper Problems

Prevention remains far more effective than repair when it comes to tent zipper maintenance. Simple habits integrated into your camping routine can dramatically extend zipper life and reduce field failures.
1. Keep Zippers Clean and Dry
Regular cleaning prevents debris accumulation that leads to most zipper problems. After each camping trip, brush or vacuum tent zippers to remove sand, dirt, and organic matter that can cause sticking or corrosion.
Allow tents to dry completely before storage, as moisture trapped around zippers promotes rust in metal components and can cause fabric shrinkage that stresses the zipper mechanism.
2. Avoid Forcing a Stuck Zipper
When a zipper resists movement, stop immediately and diagnose the problem rather than applying more force. Forced operation typically worsens existing problems and can cause new damage that’s more difficult to repair.
Take time to clean and lubricate stuck zippers before attempting operation. This approach usually resolves the issue quickly and prevents damage that forced operation would cause.
3. Zip and Unzip Gently to Prevent Damage
Develop smooth, controlled movements when operating tent zippers rather than quick, jerky motions that stress the mechanism. Hold fabric taut to reduce tension on the zipper while operating, and ensure the pull tab moves straight along the track rather than at angles.
Teach all tent users proper zipper technique, as damage from improper operation affects everyone sharing the shelter.
4. Store the Tent Properly to Avoid Zipper Wear
Store tents with zippers partially open to avoid permanent compression of the closure mechanism. Completely closed zippers under fabric tension can develop memory that prevents proper opening, while fully open zippers may allow fabric to shift and create alignment problems.
Choose storage locations that avoid temperature extremes, as repeated expansion and contraction can affect zipper component alignment over time.
5. Apply Lubricant Regularly During Camping Trips
Maintain zipper performance during extended camping trips by reapplying lubricant every few days or after exposure to sand, salt water, or dusty conditions. Regular maintenance takes only minutes but prevents problems that could compromise your shelter when you need it most.
Carry a small amount of zipper lubricant or a pencil in your repair kit for quick maintenance in the field.
Final Verdict
Keeping your tent’s zipper in good shape is easy with simple maintenance and the right tools. Regular cleaning, lubrication, and careful use prevent most problems, while a basic repair kit ensures you can handle issues quickly in the field. With these habits, your tent stays functional and ready for years of worry-free camping.
Frequently Asked Questions
1. Can I fix a broken zipper slider myself?
Yes, most zipper slider problems can be fixed with basic tools or a replacement slider. Looseness or sticking can often be resolved by cleaning and tightening the slider, while completely broken sliders can be replaced using a simple zipper repair kit.
2. How do I fix a zipper that keeps separating?
Tightening or replacing the slider usually stops a zipper from separating. A worn slider can’t hold the teeth together properly, so carefully adjusting it with pliers or installing a new slider restores smooth function.
3. What’s the best lubricant for tent zippers?
Zipper-specific lubricants, silicone spray, or even candle wax work well. Lubrication helps the slider glide smoothly, prevents sticking, and reduces wear on the zipper teeth.
4. How long does a zipper repair usually last?
A proper slider replacement can last for years, while temporary fixes may only last for one or two trips. Regular maintenance and gentle handling help prolong the zipper’s lifespan.
5. Should I attempt DIY repair or take it to a professional?
Minor issues like stuck zippers or loose sliders can be handled at home. Major problems such as torn zipper tape or multiple broken teeth may require professional repair to ensure durability and proper function.
As an Amazon Associate, I earn from qualifying purchases.